Thursday, June 12, 2008

the big family reunion 'o8.

a bunch of shots from our family reunion last weekend.  if you click on them, you can view them full size.  :)

(i'll admit.. the bottom 2 kind of bug me because they don't really "fit in".. but i like them so we'll all have to overcome our ocd tendencies and deal.)


Monday, May 12, 2008

before/after, #5


this shot is from head shots i did today and is actually one of my favorite shots from the shoot. buuut that's besides the point.

she didn't like that she, "didn't have hair" on her right side from how it was set when i took the shot. i told her i would take care of it... and i always keep my promises.
i filled in the right side by cloning the left by her neck. to make it look more natural and not freakishly frizz-free, i copied the stray-ish hairs from the left and flipped 'em to blend in on the other side. of course, then the two sides mirrored a little too closely, so i filled in her left - again - with cloning.
to top it off (no awkward pun intended), i relaxed the top of her hair a little bit just by liquefying.

it was a little frustrating... and i just noticed something i could've touched up a little better, but if you don't notice it, than neither do i ;) and for the hel of it, here are more of my favorites from my shoot w/ sarah today:


[you can click on them to see them full size.]

Tuesday, April 29, 2008

before/after, #4


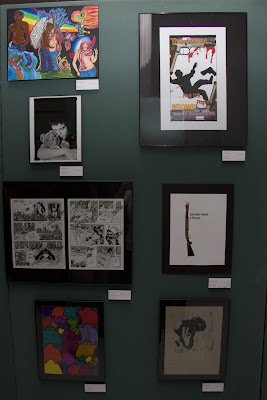
this picture is (clearly) not intended for artistic purposes. it was shot as part of a project i am doing for a client. but i don't post on this site for the photographic content, i post for how i made the content look better ;)

lighting shots in the room i was in (at the boston state house) was extremely difficult. i had my flash in every possible angle; sometimes i would get lucky, sometimes i would end up with shots like this. right off the bat, i needed to balance the light. i lightened up the whole shot with a curves layer, then masked out the top half and blended them together.

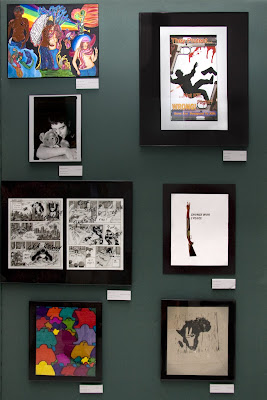
the next most important thing, besides the obvious lense distortion, was to bring contrast and color back into the art work. i actually just started with the comic piece and then realized it might look good if i masked in the rest of them, as well.

finally, i had to take the reflections out of 2 of the frames. more than anything, i had to take myself out of the middle one on the left. honestly, i just made a selection around the mattes and painted them in black blending them through. you can probably notice there is still a slight reflection in the upper right corner piece. i didn't want to paint it out entirely so that there's still a sense of the glass frame. otherwise, it would just look like i... literally painted over the glass.

Thursday, April 3, 2008

before/after, #3


i'm not used to retouching male models, so it's somewhat difficult to keep myself from over-retouching. men shouldn't look plastic. of course, neither should women, but that's where retouching tends to take us. i think i may have over did him just a bit, but let me know what you think. i believe i lose the right to judge my work after staring at a shot for 3o-4o minutes.

the colors are a bit off, which tends to happen when i convert from raw to jpg. i know there's a way to fix that, so i'll be repost as soon as i have the chance to reconvert. his eyes are much more blue in the tiff image, though.

the hardest part of this job was the tattoo. removing it without blending in the background hue was rather frustrating. i found that i tend to make things more difficult than they need to be sometimes. first, i tried patching, but he blended with the background. then, i tried the healing brush (the actual healing brush, not the spot heal). it worked a little better, but i was still getting the gray tint on his arm. finally, i decided to go back to basics and just clone it out. with the right hardness, it was almost too easy. typically, assuming the tattoo is surrounded by "skin pixels", patch would be the best deal, but it all depends on the shot.

Wednesday, April 2, 2008

before/after, #2


first time appling digital makeup!
the hardest part was that damn strand of hair down her face.

i did the eyeshadow by creating a new pixel layer with a soft light blending mode. then, i made a selection around the eye and inverted it so that everything *but* the eye was selected. (it sucks when you get eyeshadow in your eye...) with a semi-low opacity (50-70%) i painted the color i wanted right on the lid. then, with a slightly lower opacity (30-50%), brushed a lighter shade of that color over the top. no special paintbrushes, just a small very, very soft brush.

for the liner, i used a slightly harder brush (not much more than 50%) and sampled the color from the top lid. if you're putting liner on a girl with no makeup, i'd use a really dark charcoal rather than jet black, but it also depends on her lash color. then, i just painted right along the bottom of her lid. after, i used the smudge tool to blend it in so it didn't look like i... painted along the bottom of her lid... (only blend down into the skin. there's no reason to smudge it into her eye. let's be sensitive to things in the eyes...) you can play with the opacity after that to bring some texture through.

the most difficulty i found i had is that... i'm no makeup artist. i know what goes well with my skin and my eye color, but i really had to wing it here. my instructor advised that if you really want to master photoshopping makeup to check out fashion sites of magazines, photogs, anything that can give you some ideas as to what goes where and what colors compliment each other.

* * * * *

this image was used on my other blog, frozen.oranges,
in an entry i wrote about intertwining my love for digital retouching
and my passion for raising awareness about eating disorders.
the entry is called, "maybe she's born with it, maybe it's photoshop."

Thursday, March 27, 2008

before/after, #1


this is one of my favorite models (shots) that i've taken at school. the biggest thing for me, here, was to really bring out that eye color. (i love brown eyes.) it was also the first time i had the opportunity to really soften skin down. i've gotten more good feedback than bad. most people love the skin softening i did, some say it's too plastic-y. and, it is, a bit, but it's what i was going for.

the 2 hardest parts of this retouch job were the hair on the side of her face, and softening the skin down with a gaussian blur without getting a pink halo under the hat.

the truth is, i loved her skin as is. i sometimes find myself at a crossroads when it comes to beauty retouching when i know i want it to look that certain fake way, but the model's already absolutely beautiful.